Showing posts with label diabetic friendly. Show all posts

Sunday, January 25

Super Grain & Nut Free Tortillas

There is a universal truth about giving up grain: It's DAMN hard. Whether you are paleo, low carb, keto or primal, a common thread is no grain. You may start out all cavalier and cocky thinking you won't miss grain, but a few days or weeks in and suddenly you remember bread, pasta, tortillas and you would claw your own eyes out for a piece of toast. I'm not kidding. That is why it's so important to have some great subs on hand. These tortillas totally will quell your cravings and work amazing as a flour tortilla sub. I've even had success with my totally grain eating hubby and kid eating and enjoying these.  They are fabulous right out of the cast iron skillet and freeze very well. When reheating, I always recommend using a skillet, as that gives the best taste, but in a pinch, the microwave will work, or you can just eat them at room temperature. Up to you. My recipe is adapted from Maria Emmerich's tortilla recipe. She uses almond flour or coconut flour in hers, however I wanted to reduce the fat and try and go nut free. I find coconut flour too sweet for my taste, so didn't want to use that either. Most people on these types of diets don't get too fussed about fat and calories, but for me, although I do not gain weight on a keto or low carb diet, I don't lose any either. So, for me, calories matter! You can follow Maria's recipe using almond flour or you can follow mine using my new favorite faux flour:


This is reduced fat sesame flour. It's high in protein, gluten free, nut free and much lower in fat and calories compared to almond flour. I'm not sure if the company is Norwegian, but I have seen their products on Amazon UK--not sure how popular it is in America yet. But I have found it works great in these types of recipes.

Grain & Nut Free Tortillas (adapted from Maria Emmerich)
11/4 cup reduced fat sesame flour
5 TBL ground psyllium husk
2 eggs
1 tsp salt
1 cup boiling water

Combine your dry ingredients in a bowl (note, there is NO substitute for the psyllium husk), add the two eggs and mix until combined. Pour in the water and mix until thoroughly combined. Let it rest for 5-10 minutes to firm up. The original recipe yields 10 tortillas. I tend to get 18-20 out of mine, but I roll them very thin. Do it however you want.

I always start by dividing the dough into ping pong sized balls and then flatten them out in my hand:


Then, between two sheets of parchment paper, using a rolling pin, roll it out in as close to a circle as you can get it & as thin as you can get it. Don't worry, it always looks wonky:


I always use a knife to cut around the edges to give it a cleaner shape and then save the scraps to make another tortilla at the end:


Throw it in a cast iron skillet and cook until slight bubbles appear, then flip:


Repeat. Repeat. Repeat. Repeat- About 15-20 times. When you are finished you will have a stack of lovely tortillas that even a grain lover would have no complaint about:


These really are great and I eat a ton of them. I use them for all kinds of tacos: carnitas, breakfast, beef, chicken etc. I fill them with tuna or chicken salad. I carry them in purse to have in a pinch when out in about (yes, I took a hamburger off of the bun and threw it in one of these bad boys just yesterday!). They are super versatile and will make your grain free pursuit a happier and calmer one!
Carnitas:

 
Breakfast tacos:


All dolled up and ready to eat!


Go make these! I promise you will thank me!


Sunday, September 28

Dreamy and oh so creamy! Dairy free, Paleo coffee creamer

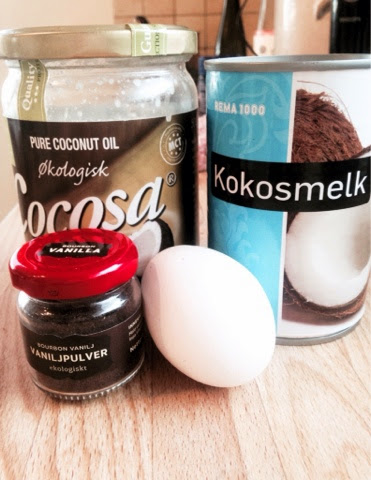
I've been meaning to blog about this creamer for quite some time, but now that I am embarking on a new sugar detox tomorrow, the timing is perfect! I don't remember where I got the recipe, as it was a long time ago, but probably off of Mark Daily's Apple or some other Paleo discussion forum. For me, my morning coffee is a really important part of my day, and dang it I wish I liked it black, but alas, bleh. I like it creamy with a slight coffee taste. This is super easy and makes the transition to being dairy free much easier. It only has 4 ingredients, one of which is optional:
 
Coconut milk, a pastured egg, coconut oil and vanilla
Buy full fat coconut milk and one with the highest amount of coconut milk actually in it. This one has 91% and only 9% water! You'd be shocked at how many have less than 70%, so read the label! I like to add the vanilla, I use Bourbon Vanilla powder. Tiny little vanilla beans in a jar. Delish.
Yes, there is a RAW egg in this recipe. I don't worry about salmonella. I get my eggs from the farm next door and this one came out of the chickens butt about 5 hours ago. So, if you trust your source, just use the raw egg. It helps keep the creamer creamy, so is kind of necessary to the recipe.
With the exception of the coconut oil, add everything to a blender or a container for your stick blender:
 
Aren't those vanilla beans lovely?
I used an immersion blender. Just stick it in and blend on high for about one minute. I use the same technique I use when making mayonnaise. Just hold the blender over the egg, pressed to the bottom of the container and blend until the eggy yellow spreads up to the top. Once your creamer is a lovely shade of lemon yellow, drizzle in your coconut oil and blend for another 30 seconds or so. That's it. Easy peasy.
Pour it into a jar for storage and put it in the fridge! After a few hours you'll be able to spoon it out. I've also used this as a frosting before. So, it's versatile.

Thick and creamy. Yum.
So, that's it! Easy dairy free coffee creamer. This will help ease the transition if you're detoxing or moving into a stricter Paleo lifestyle and it's really good for you. It should keep for at least 2 weeks in the fridge, but I can't promise that as it never lasts that long here. Try it out!!!

Dairy free, creamy goodness

Friday, June 27

Low Carb, Paleo Sushi- and No, I'm not kidding.

When one makes the decision to embrace a grain free diet, one often fails to consider that one of the carby delights in life, sushi, will no longer be a regular staple of the diet. I like sushi, but I am not a purist, I'm a roll kind of gal. Which in some sets, is the trash of sushi. I like things with rice, tempura-ed shellfish, cream cheese, things with the word 'rainbow' in the name, avocado, things with the word 'California' in the name. I think you get the gist. So while I could have proper sushi, nigiri, on a paleo diet, I have ZERO interest in eating raw fish by itself. I love the soy sauce, the wasabi that makes my nose burn and eyes water, the pickled ginger. I do not like the seaweed. I have tried, but the smell, THE SMELL. So, when I went out and ordered sushi, I would order it made with soy paper, which is amazing. However, my weekly sushi habit went to carb heaven many moons ago, but man, there are times when I still intensely crave the stuff! I've thought a few times about how I could 'paleo-fy' it, but really, how do you do a sushi roll with no rice?? Stop being ridiculous! But, I've been craving sushi something fierce lately, so on my hour long commute to work, I've been putting this together in my head over the last week or so. I got the idea when I made a recipe for bacon, zucchini, feta rolls found here. When I made them, I took them to a weekend lake trip and made an appetizer plate and as I cut them I thought, huh, I wonder if I could do a sushi type roll using zucchini? It's been marinating ever since, so tonight I thought I would give it a try, and quite honestly, I wasn't convinced it would work, but the worst that could happen was that I would end up with a bowl full of ingredients and call it a 'sushi salad'. So here we go!!
 
First you have to resolve the rice issue. The only sensible solution is the low carb staple, cauli-rice:

magical cauli-rice
 
To make the rice, just grate the cauliflower with a box grater and microwave it for 2-3 minutes on high. I added a splash of rice vinegar, a splash of sesame oil and sea salt.

Next, I had to decide what to wrap it in since the seaweed wasn't an option and this is where the zucchini comes in. So, I took a vegetable peeler and made long, flat zucchini strips:

zucchini ribbons
 
I had decided to make a California roll for this experiment, so assemble the cast of characters:

King Crab- no fake stuff here!!!


cucumber cut in matchsticks
 
avocado
 
My first approach was to lay 4 zucchini ribbons slightly overlapping, to recreate the size of a sheet of seaweed:


Next, I spread a thin layer of the cauli rice on the zucchini like you would do with sushi rice:


Add the cucumber, a bit thickly, because you need some volume to make up for the lack of rice:


top with the matchstick cucumbers
Now, the king crab! Try and splurge on real crab. The imitation stuff is scary with the stuff they add! And the real thing tastes exponentially better!


King Crab

Finally I added the avocado and I was ready to roll!

avocado

The first few rotations turned out fine and I was feeling like maybe I was gonna pull this off!

rolling


However, by the end, so much filling had pushed out and it was not sturdy at all:


So, I scraped out all the filling and decided to use a single zucchini ribbon for each roll:

single ribbon technique
And to make them even more secure, I used a piece of spring onion to tie it and from there on it was smooth sailing!

finished Paleo sushi!!
Once they were all rolled and secured, it really was a great sushi experience! A big part of the sushi ritual for me is the taste of the soy sauce and wasabi, so for me, to dip it into that and have that burn and taste, it was amazing!

Ready to start eating!


They were sturdy enough to use chopsticks with and truly satisfied my sushi craving!

You can use chopsticks!


This was an amazing recipe and was a milestone for me in my low carb journey. To actually think outside of the box and recreate something that really is a tough one to recreate in a grain free way, but everything is possible! You just have to suspend your expectations! Did this taste like 'normal' sushi? Of course not, but did it taste like a California roll? YES, it did! Try it!

Beautiful sushi!


Sunday, June 22

Paleo Indian 'oh my GOD these are good' Meatballs

I am just going to come out and say it, this is one of my BEST recipes yet! Partly because it is actually MY recipe. Creating new, clever and unique foods is not so simple anymore with the plethora of food bloggers out here on the internets. Usually when I think of something to make, I google it and someone else has already done it, and because I am pretty lazy by nature, I just say 'huh, yea, I'll use their recipe'. But not tonight kids, not tonight.
I have been looking at make ahead paleo meals that I could freeze and have on hand for quick easy meals during the week and I found a recipe for paleo crockpot meatballs. I was going to make those, but then remembered that we had Bolognese just last night, and these meatballs were essentially the same thing, but bigger. So, there I was with 2 pounds of ground beef that I couldn't refreeze and I thought to myself, 'Indian food sounds good'. And then I jokingly said 'I can make Indian meatballs'. I had a good laugh, because stereotypes and stuff, but then sobered up and thought 'why couldn't I make Indian meatballs???'. So of course I googled 'Indian Meatballs' and a whole SLEW of recipes came up (dammit!!), but my wheels were turning already, so I briefly looked at one and saw all the nasty breadcrumbs, vegetable oil, and other non paleo ingredients and set out on my own. Join me, won't you?

Paleo Indian 'Oh my GOD these are good' Meatballs
For the meatballs:
2 pounds ground beef (grass fed, organic if possible, you know the drill)
2 large eggs
1 cup 'breadcrumbs'- recipe link below
1/2 can coconut milk
2-4 TBL of fresh minced ginger (to your taste)
Indian curry spices (again to taste)(what I used listed below)
dried onion flakes
dried minced garlic
handful of fresh coriander (cilantro)- chopped
handful of fresh parsley-chopped
sea salt
For the sauce:
1 large onion chopped
2 garlic cloves chopped
2 boxes of chopped tomatoes
3 TBL tomato paste
4-6 TBL curry paste
2 cubes organic beef broth
1-2 TBL coconut oil
1 cup water
the other half of your can of coconut milk

Let's get started!

If you don't know already, I will let you in on a secret. The secret to a delicious meatball is BREADCRUMBS. Something about those breadcrumbs makes the end product super moist and delectable. I was thinking of what I could sub, almond flour perhaps, when I suddenly remembered a batch of 'Ben's low carb Rye Bread' I had made a few weeks ago. This is a great paleo bread to use for sandwiches, toast, ect. So I cut a couple of slices and put it in my food processor and whipped it into bread crumbs. To these I added the coconut milk and set it aside to soak until I was ready for it:
 

'bread crumbs' soaking in coconut milk
 
Next, I combined the ground beef and spices. I know I was vague up top about ingredients and amounts, but really, whatever Indian spices you have on hand will do and some people like varying degrees of spice. I recommend against using a prepared curry paste as they are usually full of sugar and bad oils and I really recommend Penzey's for spices! They have hand mixed blends that are amazing! In my meatballs I used their Rogan Josh, Vindaloo, Cumin and Russian Sausage seasonings, liberally. I also added their freeze dried onions and garlic along with the ginger, coriander, parsley and sea salt. To this, I added the eggs and the breadcrumb mixture and dug my hands in and gave that meat a nice massage! I didn't take a picture of the big bowl of meat mixture. Sorry. When you are done and you have tasted it and are satisfied with the flavor, set it aside.

For the sauce, chop your onion and garlic and cook it over medium high heat in your coconut oil until it starts turning translucent. While they are cooking take 4-6 tablespoons of your curry powder and add some water to it to make a paste. Now add this paste to the onion and garlic and stir it all together. It will smell delicious. Add your tomatoes, tomato paste, water, beef stock cubes and stir til everything is incorporated and it's bubbling. Taste it. Adjust your spices as necessary.
Spicy sauce simmering (say it fast a lot of times)
 
Now it's time to make the meat balls. Just dig in and form balls with you hands:


and drop them into your tomato gravy one by one til the pot is full. Let everything bubble and get acquainted for about 5 minutes, then turn the heat down to a simmer and cook them until finished, about 20 minutes I guess:

 
At this point, I started getting very excited. These bad boys smelled delicious and I couldn't wait to taste them. I recommend getting another pot and putting the meatballs you are going to eat NOW into it with the appropriate amount of gravy before adding the coconut milk. The coconut milk really finishes this off well, and if you add the small amount of coconut milk into the giant pan of meatballs and gravy, it'll get lost and disappear. Trust me on this. Add your coconut milk:
 
Stir until combined and keep it on low heat until you are ready to eat them:

I topped my meatballs with fresh picked rocket salad from Torstein's garden down the road and the spicy, peppery green really was a nice complement to the dish:
These are seriously good! The faux breadcrumbs made them moist. Not as moist as real breadcrumbs, but so much moister had I not used any. My non paleo family members loved them and had theirs with coconut rice and I think I said 'Oh my gosh, these are soooooo good' at least 12 times in the 25 minutes we sat at the table. I hope you try them because I know you will LOVE them and make a big batch, because these are great to portion out and freeze and grab and go during a busy week.
Indian Meatballs. I never would have guessed they would rock my world so hard! The clean plate speaks for itself!!!